Below is a re-post from the original genericface blog. By far the most popular post, it has been replaced by easier tools, such as picasa2flickr.
Original date: March 14th, 2006
Picasa is by far my favorite photo management software. Flickr is the arguably the best online photo sharing site (Zooomr is a rising competitor). However, one must use the email feature in to upload pictures from Picasa to Flickr (see Jim Rutherford’s Blog). I find this method insufficient for a variety of reasons; primarily because email is not the best method to upload a batch of pictures. Mac users have a variety of cool options to upload pictures to Flickr, but they are not available for Windows. Thus, I sought and found a better way to upload pictures from Picasa by using Uploadr.py and Windows Task Scheduler.
- Download Python Users will need to have Python (a programming language) installed on their computer. If you don’t think you have Python, you probably don’t. You can grab the most recent version from their downloads page. Choose the “Windows Installer” and install it to your system. It’s pretty straight forward and users shouldn’t need to change anything.
- Create a new folder You’ll need to create a new folder (I suggest calling it “export” or “upload”, but it doesn’t matter) in either the My Documents or My Pictures folder. Then open up a new Notepad or Wordpad document.
- Get Uploadr.py After downloading Python, creating a new folder, and opening up a blank Notepad/Wordpad document, you’ll need to go over to the Uploadr.py webpage to grab a couple of things. First, scroll down and click on the “download” link. Copy and paste the text into your blank document and save it in your new folder as “uploadr.py”. Then, return to the Uploadr.py page and click on “xmltramp” link. Copy and paste the text into a new document. Save the document as “xmltramp.py” in your new folder.
- Edit Uploadr.py Go to the new folder and right click on “Uploadr.py” and choose “Edit with IDLE”. The Python editor will appear with the text copied from the web. Find “IMAGE_DIR” and type in the path of the new folder. For instance, if you created a folder called “upload” in My Pictures, the path will probably be C:\Documents and Settings\user\My Documents\My Pictures\upload where user is the Window’s user account. Save the changes to the document and close.
- Permissions Double-click on Uploadr.py. A DOS window will briefly pop up and eventually bring up your web browser. Flickr will ask you to let Uploadr.py have write access which needs approval in order to work. After approving access, switch to the DOS windows which should ask if the application have been granted authentication. Type “Y” to let the program continue. At this point Uploadr.py is working. To test it, copy and paste an image into the folder and double click on Uploadr.py. A DOS window will briefly pop up and close. Wait a minute and then check to see if the image is loaded onto Flickr.
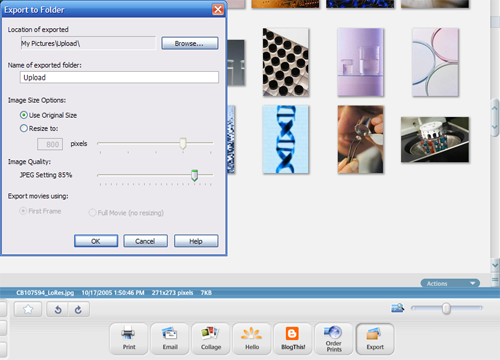
- Using Picasa Picasa has an export feature located in the lower right hand corner of the screen. Select the photos you would like to upload and click on “Export”. A dialog window will pop up and ask where to save the pictures. Do Not select the new folder to export the pictures, instead, choose the directory above it. For instance, if the new folder is called “upload” in the My Pictures folder, then choose the My Pictures directory and manually type in “upload” in the name of the exported folder. Make any adjustments to the resolution of the pictures and click export. Now a copy of your picture will be located in the new folder and ready to be uploaded. Double-click on “Uploadr.py” to start the script and the photos will be uploaded.
 You’ll notice a couple of things. First, the file name will be the title of the photo in Flickr. Second, if you had a caption for the
picture in Picasa, it will show up as a caption in Flickr as well. I particuarly like this feature. In addition, uploaded pictures are kept in a log file. Thus, Uploadr.py will not upload the same picture twice until the log has been cleared or deleted. - Making it automatic Double-clicking on the Uploadr.py script is still somewhat annoying. However, Windows (as well as Mac’s) are able to run programs at specified times with the Scheduled Tasks application. You can find it in Start Menu -> All Programs – > Accessories -> System Tools -> Scheduled Tasks. Double-click on “Add Scheduled Task” to bring up a wizard. You’ll need to click on Browse to find the Uploadr.py script in the new folder. After finding it, choose the times you wish to automatically run the program and click finish.

Now you can use Picasa to export pictures to a directory which will automatically uploaded at a specified time. The Uploadr.py script includes a few extras like specifying tags to uploaded pictures. Similarly, you can specify if the pictures should be available to the public, friends, or family. You cannot assign individual tags to a photo, you’ll need to log into Flickr to do that. But until someone comes up with a plug in for Picasa, this is perhaps the best way to integrate Picasa with Flickr.


483671 720110Following examine a couple of of the weblog posts on your web website now, and I truly like your manner of blogging. I bookmarked it to my bookmark web site record and will probably be checking back soon. Pls take a look at my web page as nicely and let me know what you think. 716014